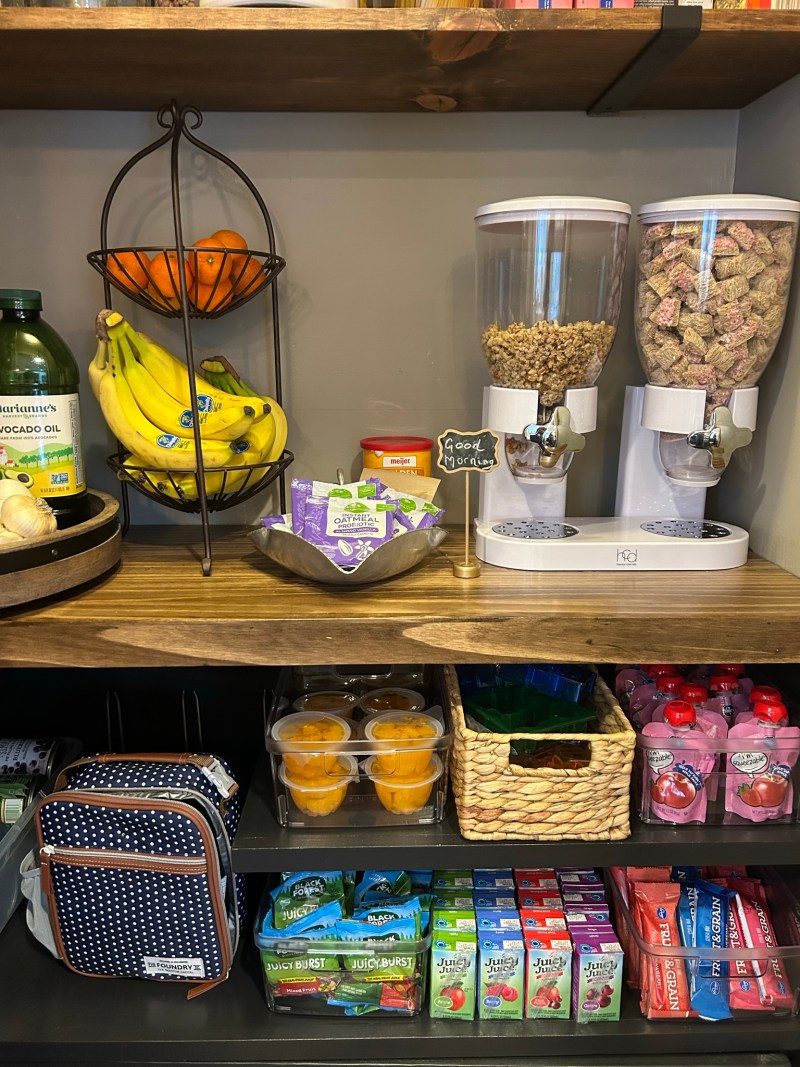
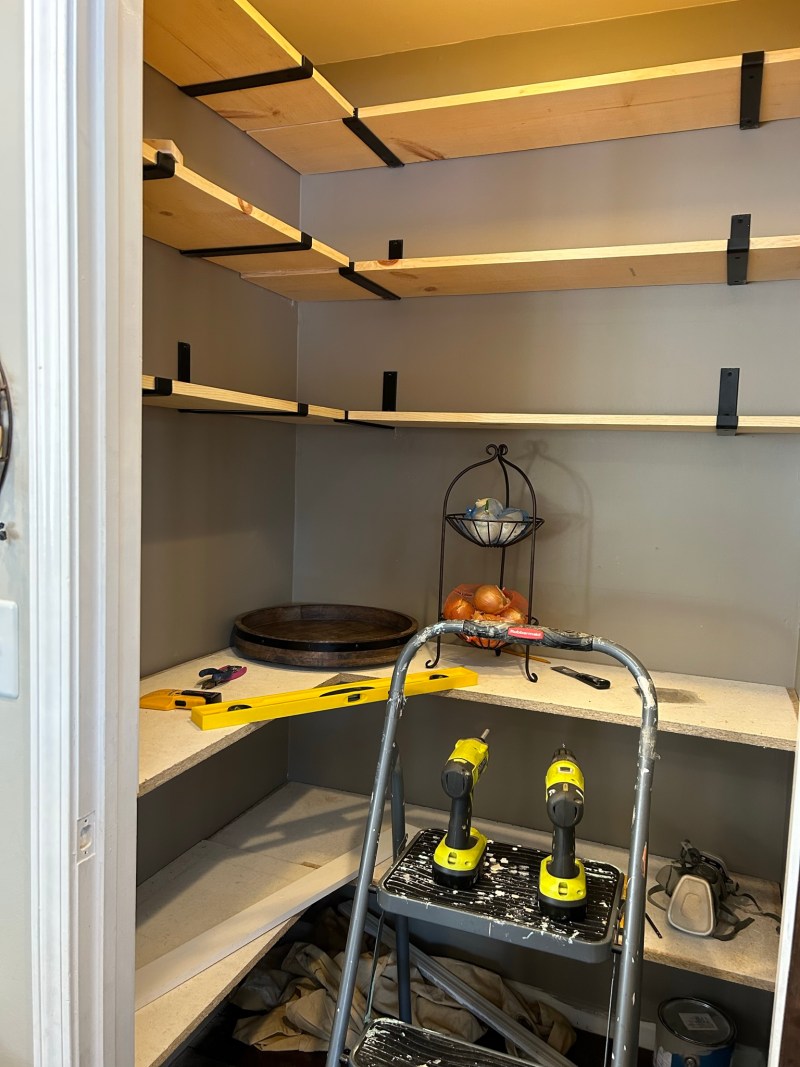
This pantry makeover is probably the most dramatic before and after DIY project so far, which was completely unexpected. This little space has made a big impact on the function and flow of the kitchen.
It feels like we added an extension to our kitchen, whereas before, it was a messy, dysfunctional closet.
While it was not at the top of my DIY list, the pantry has been a nuisance and an eyesore since we moved into this house, so it has slowly crept up the list. I'm not sure what bothered me more: the wasted space on the left side wall of the pantry, or the dysfunctional, excessively deep shelving that made it nearly impossible to keep inventory and avoid unnecessary food spoilage. As you can see below, the four jampacked shelves were in disarray.

The solution was to combine shallow upper shelves all the way to the ceiling, along with a deeper countertop and lower open shelving along with a pullout bin to make this part of the pantry so much more functional.
Below, you can see how the storage potential on the left wall of the pantry was essentially unutilized, which drove me crazy.
The extra shelving, addition of a countertop, and pullout bin increase storage and function tremendously.
The combination of shallow shelving and clear food storage containers allows me to easily take inventory while meal planning, along with keeping food fresh.
I love the glass Mason jar food storage containers below. They were a great Home Goods find.

One of my favorite pantry additions is this grain dispenser that holds my entire 25lb bag of rice from Costco. This airtight rice dispenser comes with a measuring cup that dispenses rice in the perfect portion at the push of a button. The window allows me to see when I need to add rice to the list. I cook a lot of bowl meals with rice as the base, so it was money well spent.
We have also been making our own sodas and experimenting with homemade syrups and fruit. The fountain fits perfectly here and frees up countertop space in the kitchen. Having the countertop protected with multiple coats of polycrylic makes spill cleanup a breeze.
This post contains affiliate links. As an Amazon Associate, I can earn a small commission, at no cost to you, on qualifying purchases.
Creating a breakfast bar and lunch packing zone helps the big kids with their school morning routine. We have renamed the lunch packing zone, "The Tot Shop" as it has become our little one's favorite place to shop for snacks. The clear plastic bins are perfect for this zone because I can quickly assess snack inventory. I found them at Home Goods in a 4-pack.

I wanted the breakfast bar to feel like a continental breakfast at a hotel. It has early morning road trip vibes! Some fresh fruit, an assortment of oatmeal, and these fun cereal dispensers that hold 2.5 boxes of cereal each! Before, I would find empty boxes of cereal in the pantry, but now I can see when I am running low. Teens love their cereal!
My initial plan included custom-built base cabinets with a corner lazy Susan, along with adjustable cubbies to house my small kitchen appliances. However, after pricing out the initial plans with the astronomical cost of wood currently, I had to come up with a more affordable plan that included reusing the existing shelving and utilizing open shelves along with inexpensive pull-out bins made with scrap plywood and pine, instead of custom cabinetry.

This project was finished in the span of three weeks, working with pockets of time on the weekends and two babysitting sessions. I did it completely by myself, so if you have an extra hand, you can probably greatly reduce the time it takes and finish it in a weekend or two. Having to replan and repurpose old materials added to the completion time.
I ended up moving items back into the pantry between the finishing phases, simply because I needed the countertop and table space. We are not a take-out kind of family, so the kitchen is always in use.
The first step was to take everything out of the pantry and sort everything into categories. It was helpful to take measurements of appliances and other regularly purchased items that would live in the pantry so I could plan the shelving placement to accommodate them.

The most stressful part of this project was having every kitchen surface occupied with pantry items. It definitely motivated me to finish the project as quickly as possible! For some reason, having the kitchen messy was a que for the rest of the family to leave their messes everywhere. Double the stress!
After emptying the pantry, I took the shelves out and started prying the shelf supports off the wall.
My little helper and I worked to patch the holes and dents in the drywall with this spackling. It's my favorite spackling because it goes on the wall pink and turns white when it is ready to be sanded and painted.
Once the spackling turned white, indicating it was dry, I sanded the walls down with 120 grit sandpaper and vacuumed the dust.
Now for the part that I really regret: the paint color. Instead of buying a quart of Revere Pewter to match the kitchen, in an attempt to save a few dollars, I used leftover paint in a color called Indian River. It's a few shades darker than Revere Pewter, and while I like the color in our great room, it's too dark for the pantry.

After the paint was dry, I marked on the wall where I wanted my shelving to be. This is also the time you want to use your stud finder to locate the studs. I made sure that every shelf support was attached to a stud.
When you're installing shelf supports, make sure you use a level throughout the entire installation, especially on the corners where two separate pieces of wood will meet.
I reused the shelf supports for the lower shelves and countertops and ordered these shelf supports for the uppers. I love these particular shelf supports because they fit 1X12 common boards from Home Depot, so I only had to cut the boards to length, which Home Depot can do for you if you don't have a saw.
I needed some 14" deep flat bracket shelf supports for the lower shelving, so I ordered these brackets from Amazon. They worked perfectly to support the areas of the shelving that were not held up by the wall supports. Once I had all of my shelf supports attached to studs on the wall, I brought in the reused shelving that I had cut down using my track saw, and the new 1X12 upper shelves. I dry fitted them before taking them outside to stain. It's much easier to make cuts and adjustments before the finishing process.

Although I saved a ton of money reusing the old shelves, I had to find a way to resurface them. They were rough, old and just nasty. The most affordable option was a 4ft X 8ft sheet of 1/4" underlayment that I cut into strips using my track saw. It was only $3 more than a roll of shelf liner. I used construction adhesive to attach the underlayment to the old shelves.
I added 1.5" pine trim to the edges to finish the look. Since these had to be prepped for painting, I used spackling to cover nail holes and gaps in the seams. After sanding and painting, they are seamless.
I wanted to stain the countertop and put a nice finish on it, so I ended up refacing the countertop shelves using some 1/2-inch pine panels that I had leftover in my garage. I used 2" pine trim on the edges to finish the countertop and give it a thicker appearance.
Once the dry fit was complete, I took all the wood into the garage and stained it. If you're using oil-based stain like I did, wait a few days to allow the stain to dry completely before bringing it back into your house.
After the stain had dried, I brought it back in and installed the wood shelves and countertop. I applied three coats of the finish I had on hand, which was Varathane satin water based polyacrylic, which will adequately protect the countertop from spills and scratches.
Initially, I was going to paint the lower shelves bright white with Benjamin Moore trim paint that I had leftover. However, to give the lower shelves the appearance of base cabinetry and to match my island, I went the complete opposite direction and painted them with Benjamim Moore Onyx, a black paint. No regrets!
I will go into more detail on how I built the lower pullout bins in my YouTube video. To summarize, I built two boxes and attached swivel casters to the bottom of each then built drawer fronts. The paper towel pullout only required these small ball bearing casters, while the larger pullout for serve wear required these heavy-duty swivel casters.
Building two pullout bins instead of installing drawers allows me to utilize the corner space on the very bottom of the pantry.
You can see the items in the clear bin peeking through the space between the two pullouts. To access the items in the corner bin, I just have to pull out one of the bins. Do what works best for your storage needs.
Although this space ended up looking nothing like the pantry of my dreams or the pantry photos I had pinned on Pinterest, it ended up being perfect for my family.
I saved a ton of money doing it myself along with using scrap wood, repurposed materials, and leftover paint. Those big savings allowed me to purchase the fun cereal dispensers, rice dispenser and food storage containers and stay within the budget.
My advice after finishing this project? If there is a space that has been driving you crazy, even if it's not at the top of your list, just dive in and get started--you won't regret it.
I linked the shelf brackets and fun dispensers in the blog and below if you want to add them to your own pantry or kitchen. I found the other baskets and containers at my local Home Goods store. Happy building!
Click on the image(s) below for more information.


2 comments
Another amazing project! I love your creativity and use of existing materials, less to the landfills and great for the budget. It really turned out beautiful and great transformation of that space!!! Plus such a fun, informational, encouraging read. You nailed it:)
Thank you! I’m happy that the budget constraints drove me to reuse old materials. It was a win win for the environment and my wallet 🙂